Table of Contents
IMPORT FIXED WIDTH TEXT
Category: Import / File
Description
This action imports text files with columns of fixed width. The width and name of every column have to be defined explicitly in the transformation properties.
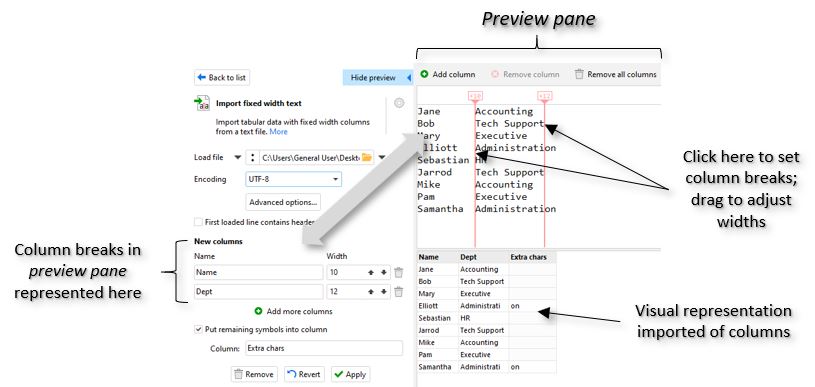
Use the preview pane (click the Show preview button) to visually split the text into columns. Click a character in the preview to create a splitter. Drag a column splitter left or right to adjust the column width.
Show preview: Preview the raw and imported versions of the dataset using the Show preview button at the top of the action settings window.
Use cases
Use the Import fixed width text file action when you have text-based data in which the fields are defined by positioning (spaces, tabs, etc.) rather than delimiting characters and you need to import them into columns.
If your data has delimiters, use the Import delimited text file action, instead. If your data is consolidated in a single field, and spacing between values is inconsistent, use the Import plain text action to read it in and use other actions to parse the individual values into columns.
Action settings
| Setting | Description |
|---|---|
| Load file* | Fully-qualified file name of the dataset (includes relative or absolute path). |
| Encoding | ASCII, ANSI (with code page), and other types of encoding. If you're not sure what to choose, try UTF-8 as it's the most common Unicode encoding. |
| First loaded line contains headers | Check this "on" if the first line of data contains the field names (headers). If unchecked, columns are given generic "column" names unless user-assigned names are provided in the New columns section. see below. |
| New columns | Refer to the table below for new column settings. |
| Put remaining symbols into column | Check "on" to capture any characters falling outside the final column's defined width. NOTE: If the First loaded line contains headers is checked "on", this column will be named "Remainder" by default. Otherwise, the user can provide the name for this column. |
* Setting can be specified using a parameter.
New columns settings
| Setting | Description |
|---|---|
| Add more columns | This button will open a list where the columns in the imported file can be explicitly defined by Name and Width. NOTE: Changes made here can be viewed in the preview pane by clicking the Show preview button at the top. |
| Name | The names to be assigned to the incoming columns. |
| Width | The size, in characters, of the column. Characters that extend past the width of the final column are dropped unless the Put remaining symbols into column option is used. See above. |
Advanced options
| Setting | Description |
|---|---|
| Decimal separator | Select whether decimal points are represented by a point (.) or comma (,). |
| Thousand separator | Select what character thousands places are represented by. Options: Default, Comma, Point, or Space. |
| Skip first lines | Defines the number of rows in the incoming dataset to skip before importing data. Use this in cases where leading rows may contain blank rows or metadata not to be included in the dataset. |
| Maximum number of lines to load | The maximum number of rows to be imported. Use "0" to read in all ("unlimited") rows. |
| Treat numeric values | Select how EasyMorph should handle numeric values. Options: Always as numbers or Always as text. |
Importing multiple files
This action can import multiple files. See Importing Multiple Files for more information.
Examples
Example 1
You are importing data from a legacy system containing name/address data with the following parameters: Fixed-width output, first row contains header information, and column widths are known to be 20, 30, 15, 2, 5.
Before (source table)
Name                City           STZip
John Hardy          Boston         MA02110
Amanda Smythe       Hanover        MD21076
Rick Johanssen      Delaware City  DE19706
After (result table)
| Name | City | ST | Zip |
|---|---|---|---|
| John Hardy | Boston | MA | 02110 |
| Amanda Smythe | Hanover | MD | 21076 |
| Rick Johanssen | Delaware City | DE | 19706 |
Action parameters
Column settings: Set these in the preview pane or enter them under New columns.
Column 1: Name: Name, Width: 20
Column 2: Name: City, Width: 15
Column 3: Name: ST, Width: 2
Column 4: Name: Zip, Width: 5
First loaded line contains headers
Example 2
You are presented with survey data that has been captured incorrectly. All values have been compressed into a single field: There are 5, single-digit responses, all combined; first row is a header row of question numbers (1-5)
Before (source table)
12345
14324
11232
45455
34234
55234
After (result table)
| 1 | 2 | 3 | 4 | 5 |
|---|---|---|---|---|
| 1 | 4 | 3 | 2 | 4 |
| 1 | 1 | 2 | 3 | 2 |
| 4 | 5 | 4 | 5 | 5 |
| 3 | 4 | 2 | 3 | 4 |
| 5 | 5 | 2 | 3 | 4 |
In this case, you could also have used the Import plain text action to read the entire field into a single cell and parse it into separate columns later in the workflow.
Action parameters
To expand these response values into their appropriate columns, use the following settings:
Column settings: Set these in the preview pane or enter them under New columns.
Column 1: Name: 1, Width: 1
Column 2 Name: 2, Width: 1
Column 3 Name: 3, Width: 1
Column 4 Name: 4, Width: 1
Column 5 Name: 5, Width: 1
Shortcuts
Fast ways to create the action:
- Press the "Add data" menu button. Pick "Import file" or "Import multiple files".

